Depth of field results from the combined use of a camera’s aperture and shutter settings to bring certain parts of a photograph more into focus than others. The aperture determines how wide the lens will open, and the shutter determines how long it stays open
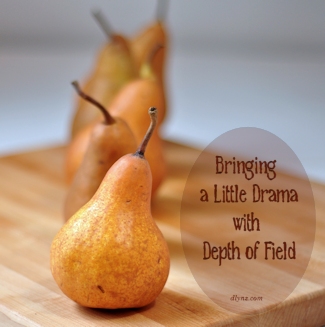
 The smaller f-stop, or aperture, number you choose, the wider your lens is open, and the smaller the area of focus in your image is going to be. The smaller your area of focus is, the less light you need to get a crisp image. An f-stop of 1.8, the lowest on my favorite lens for shooting food indoors, is going to have a pretty small area of focus. The pears in the header photo to the right were shot at f/1.8. The areas at the back of the photo are not clear at all, while the very front is well focused, and very prominent in the photo. This also meant that the shutter speed could be very fast. This was good, since it has been raining here for days, and I needed to get these photos done.
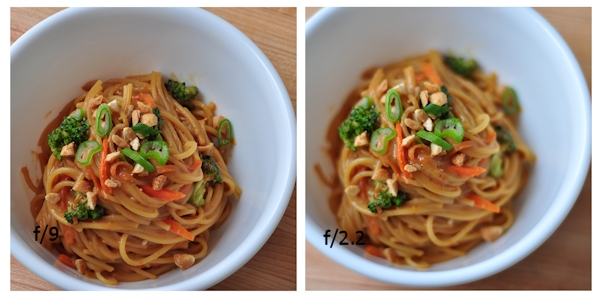
There is no hard and fast rule for how much depth of field is right for food photography. Everyone has opinions, but in the end it comes down to personal preference. These two shots of a noodle dish I worked on earlier this year are a perfect example. The light was very nice the day I shot them, giving me a lot of freedom to play with settings.
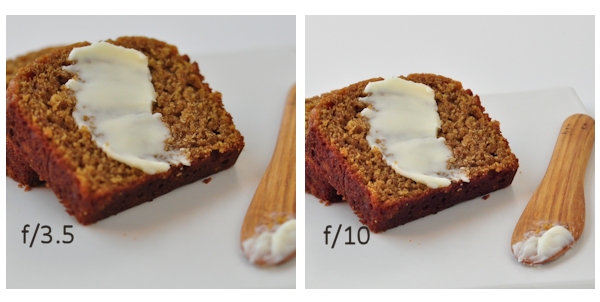
Which one of these came out the best? I think it’s a matter of taste, and though I don’t often use shots with an extreme depth of field, in this case, I used the shot on the right, because I like how the chopped peanuts and scallions looked. Who knows – if I did this post today, I might choose the other photo, which shows more detail across the whole image. I think this pair of photos may show how using such an extreme depth of field was not really a good idea. I focused on the butter in both pictures, but I find the lack of detail on the edge of the slice on the left irritating, and I’m not crazy about how the butter knife looks either. There isn’t enough area clearly in focus to satisfy my eye’s desire for something to zero in on. The photo on the right looks much more inviting to me.
 Sometimes though, bringing in a little extreme DoF can liven things up. Any food blogger can tell you that there are times when you just run out of ideas when it comes to making food look interesting. The shot on the right is okay, though I wasn’t thrilled with it, but I love the one on the left, because it really highlights the texture of the bread.
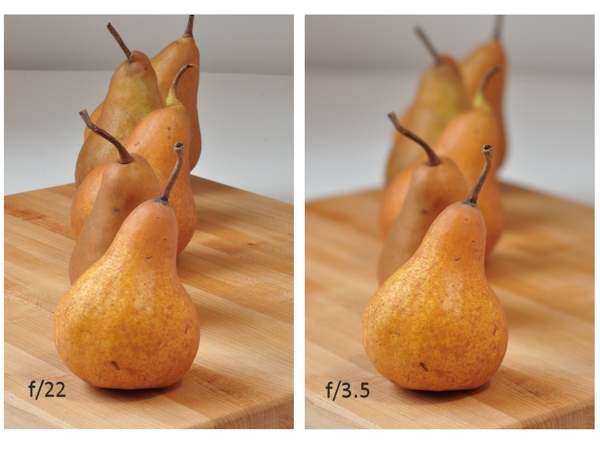
 Which brings us back where we started, with these pears. It was clear that I wasn’t going to get any better light this week. I bought the pears to photograph them, but I also bought them to eat. I already had to grab one back out of a certain someone’s hand who wasn’t aware of my plans. So in the interest of getting this done, I set up as many white boards around them as I could find, and got out my back-up lighting.
In the course of having to reflect as much light as I possibly could, I left some of my method showing. You can see the edges of the boards in a few places in the shot on the left, but when you increase the depth of field, the bokeh smooths out those rough edges. I ended up rather pleased with the results. I think the stems still look interesting and the colors in the front pear look really nice. It’s all a matter of your own personal taste, and the story you want to tell with your photos. Experimenting as you find the most effective use of this tool in your work can also be great fun!
This post is part of BlogHer’s Pro Photography Tips editorial series, made possible by Panasonic.


This is crazy! My husband lends me his amazing camera and I do not know how to use it. I try very hard but it is too complicated!. I like well defined pictures but sometimes I like to point out to a certain particular detail and very often by luck/mistake I do it!
I am a lover of shallow dof. I love the dreaminess of it . . . and it does get iffy when shooting food, doesn’t it? Sometimes I use a bigger f-stop just because I want to get the focus on everything.
To Rita above, when I was learning and didn’t know how to manually work my DSLR, I would go on the auto mode to get shallow dof. I just used the portrait setting! I’ve since learned, but if I can do it . . . so can you ~
I totally agree Kate – it truly is not that difficult to learn the manual settings. It just takes a bit of practice and getting to know your camera, because they are all different.
You can also use aperture mode – that way you set the f-stop and the camera adjusts the lighting so that you get a good shot. Some point and shoots even have a mode like that now – or a way to go totally manual.
You can do it Rita – and you will be SO glad that you did!
I always enjoy your pics, Donalyn – they make me want to learn how to cook better!
Great tutorial Donalyn. You did such a great job at explaining it and the photo illustrations really help guide you through it. Thanks for sharing your knowledge:)
P.S.
It’s funny we both posted photo tutorials on almost the same day;)
How cool! I saw this on BlogHer – you have a lovely blog, now added to my reader.
Those pears look so beautiful, Donalyn!