What is it that all of us amateur photographers say? “I am no expert.” And I’m most decidedly not, but I am working at it and I have learned a few things over the last year or so. Sometimes I learn something and don’t realize it until months later.
If you hang around here much, you know how much I love my DSLR camera. I mean, I may have mentioned that just a couple times over the last 13 months, right? But the two points I’m making today are going to apply to point and shoot digitals as well. The key is the fact that they are digital cameras. Some of you might be too young to have ever had a film camera, but back when that is all I had, film and processing costs played a large part in dictating how many photos I took. When the girls were young, I was a stay at home Mom and money was pretty tight, so taking tons of pictures wasn’t really an option.
Now, with a digital, it doesn’t cost anything to take more photos because they are on the memory card which is already paid for, right? It surprises me how few shots I see people take with their digital cameras. You never know how a shot truly looks until you get it on your computer, so don’t take chances that you missed something, or that an area you wanted in focus came out blurry or some distracting element crept into your shot. This may seem like really really basic info for some of you, but for others, you may still be shooting like you have to take the film to Rite Aid to get it developed.
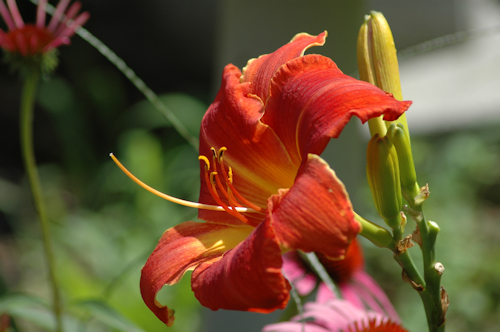
The shots below are are perfect illustration of this principle. This is a daylily called “Samwise”. I had been looking for this one for a few years, partly because the colors fit the direction I am taking my garden and partly because of the name, which is shared by a certain hobbit in “The Lord of the Rings”. I’m a sucker for Tolkien still. Looking through some of the folders on my back up drive from last summer, I ran across these shots of the first flowers on “Samwise” last summer. It is fortunate that I took a lot of shots, because this one is similar to the rest at the beginning of the series.  It would make an ideal illustration if you were writing an article on how to take a terrible photo. Too sunny, so we have some ugly shadows for one thing. And good grief – could this be any more cluttered up with junk that detracts from the bloom? A couple strands of the nearby miscanthus “Morning Light”, and a scattering of purple coneflowers that clash and obscure the edges of the main subject. I don’t know what the white blob is – the corner of the house I suppose. I didn’t notice any of that when I was taking the photos – must be where that “amateur” thing comes in. There is no fixing this photo and the fact that I even still have it can be attributed to my lack of discernment when I first went through these. [or I planned this post all along – yeah, that’s it!]
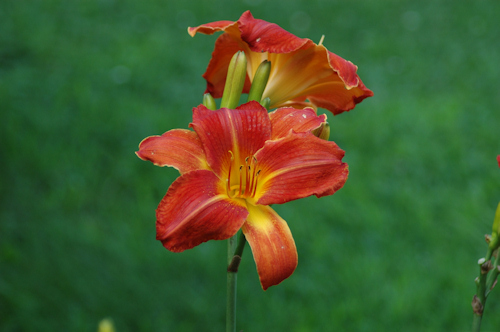
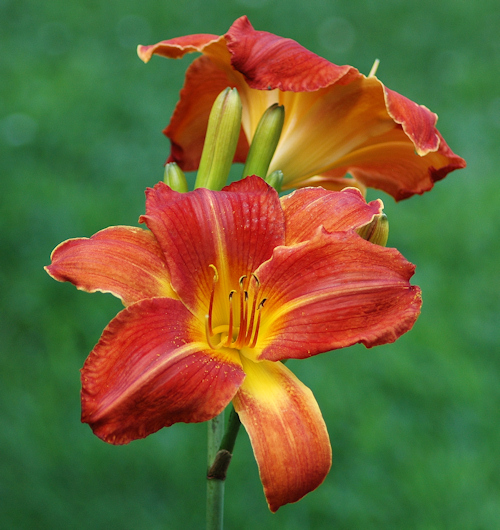
But then, 20 shots or so later, there were 5 or 6 at this angle. It’s a different scape on the same plant, but I framed this without all the bad things that are in the other ones. The sun had gone behind some clouds apparently, so the colors are more vivid with no more shadows, and it’s framed behind by just the lawn. Not perfect but it’s worth working on. Cropped, a little cloning to get rid of some water spots on the petals, a bit of bumping around with contrast levels and very small touch of sharpening and it looks a lot better.
  So, take a lot of photos, even if you think you got it right the first time. It is a small matter to hit the delete key later, but it is a rare thing to be able to go back and catch something you missed the first time. And, move around your subject, capturing it from multiple angles, to make sure you get that perfect shot. Now – go take some pictures!


 “Hmmmm – look at all that yummy seed down there.”
 ” There must be a way to get to it.”
 “I hope no one notices me out here.”
 “It’s kind of tricky.”
  “If I could just get down there on that bar.”
  “Maybe over on this side.”
  “Whoa! Kinda slippery.”
  “Oh yeah – that’s what I’m talkin’ about!”
  “Yum. Yum yummy yum yum.”
  “What the …?”
 “The darned thing nearly took my nose off!”
 “Rats. What happened?”
 “Must be broken or something.”
 “Bah! How does this thing work?”
 “Oooooof!”
 “I give up. This is way too much trouble for me.”
 “I’ll just go back down here.”
 “I can always count on the chickadees to leave me a little something.”
 It would make an ideal illustration if you were writing an article on how to take a terrible photo. Too sunny, so we have some ugly shadows for one thing. And good grief – could this be any more cluttered up with junk that detracts from the bloom? A couple strands of the nearby miscanthus “Morning Light”, and a scattering of purple coneflowers that clash and obscure the edges of the main subject. I don’t know what the white blob is – the corner of the house I suppose. I didn’t notice any of that when I was taking the photos – must be where that “amateur” thing comes in. There is no fixing this photo and the fact that I even still have it can be attributed to my lack of discernment when I first went through these. [or I planned this post all along – yeah, that’s it!]
 Cropped, a little cloning to get rid of some water spots on the petals, a bit of bumping around with contrast levels and very small touch of sharpening and it looks a lot better.
  So, take a lot of photos, even if you think you got it right the first time. It is a small matter to hit the delete key later, but it is a rare thing to be able to go back and catch something you missed the first time. And, move around your subject, capturing it from multiple angles, to make sure you get that perfect shot. Now – go take some pictures!
